
Now, that’s a title with a lot of terms.
Github Actions
You’ll probably know Github as the website where you can store your code, be agile with all sorts of branches, merges etc and keep track of your issues. There are also actions which are roughly the same as Azure DevOps pipelines. Written in Yaml (Yet Another Markup Language or Yaml Ain’t Markup Language). In short, in these files you define the actions you want GitHub to perform for you.
Terraform
You might be familiar with the concept of Iac (Infrastructure as Code); it simplifies deployments because instead of clicking until you have RSI (Repetitive Strain Syndrome), you code once and can run it many times. Looking at Azure, IaC comes in the flavors of ARM templates, PowerShell commandlets, Bicep, Terraform, Terragrunt and a number of other languages. None of them are significantly better or easier than the other, although most are easier than ARM templates in my opinion.
Terraform is created and maintained by Hashicorp, more info here.
Local deployment
When you start out with Terraform, you’ll most likely run the code locally with terraform on your own machine. Terraform works with a so-called state-file, it saves the state of the Azure deployment it left behind and compares the (new) code with the state it encounters when it runs again. Changes are resolved by changing, deleting or adding resources that don’t match the state-file.
This works fine when you’re flying solo and don’t have co-workers who can change resources as well. Whenever you need to share code, the industry standard is to use a git solution, whether GitHub, GitLab, Azure DevOps or some other solution, as long as it has version control you should be fine (providing people adhere to the correct usage of branches).
GitHub deployment
When you’ve got your code in GitHub, why not explore ways to deploy there as well. A few month’s ago, we had a company meeting with a few people from Microsoft who mentioned that deployment via GitHub had been made easier. Today I had the time and urgency to dig into that and see if I could get it to work.
Sources
I’m not going to pretend I figured everything out for myself. So here are some links I’ve used.
Connect GitHub to Azure, Microsoft
Configure OpenID Connect, GitHub docs
Create a Service Principal, Microsoft
Deploying Azure Resources with Terraform using GitHub Actions
Steps
Azure portal, App registration
First, I got into my Azure Portal and created an App Registration.

By default, this registration is empty but you can now connect it to GitHub. To do this, go to the Certificates and Secrets part of the App registration. There you find the Certificates, Client secrets and Federated credentials. This last one is the one you’re after.

When you create one of these credentials, choose the GitHub Actions deploying Azure resources scenario. This will open the following pane:

The organisation is the name you’ve given your GitHub account. The repository is the one you want to join to Azure and the Entity Type can be environment, Branch, Pull request or Tag. In my case I’ve chosen for Branch as I want everything from my main branch to land in Azure. You can also create different environments if you like; there’s a lot to choose from.
These fields have to be filled in to generate the subject identifier. This is created automatically and you can change it if you have a very good reason for it. Scroll down to create your Credential details:
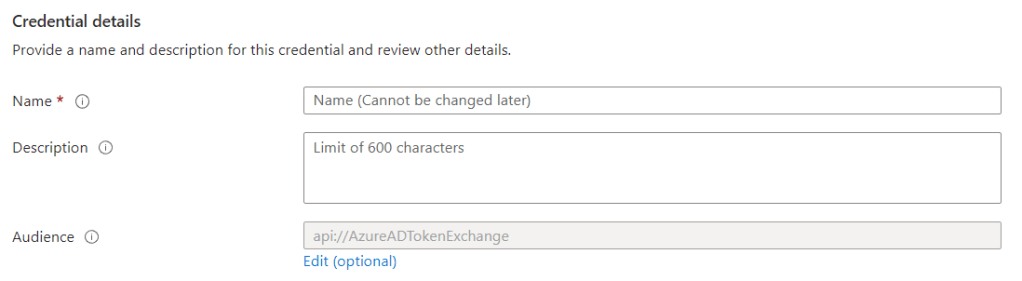
This seems like a placeholder for credentials, create a name that’s recognisable. Then click add at the bottom of the screen and you’re done.

Done? No, two more things need to be done in the portal. First, you need a Client secret to allow Terraform to connect to your Azure environment. You can create one under the Client secrets. Most important thing is to remember the expiration date of the secret.

The last step you have to take is to give your app registration privileges through RBAC roles. If you skip this step, authentication (who am I) will succeed but authorisation (what can I do) will be denied on everything. As this process is intended to deploy resources you can either create a custom role the allows the app registration to perform all the actions you want it to perform or run in with a sledgehammer and make it owner of the subscription.
GitHub, Repository secrets
Next, we move over to GitHub and go to the settings of the repository:

Click on the Settings wheel and scroll down to Security on the left. Select Secrets and variables and then Actions.
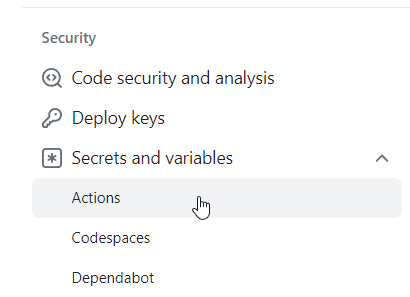
On this pane, you can create a number of secrets that you need for your deployment. You can create the secrets by clicking on the green New repository secret button:

Click on it and you’ll have to add a name and a value for this secret:

For my code, I needed the next four:

The names are essential because you’ll refer to them shortly.
Yaml Pipeline
Next comes the, for me at least, hardest bit. Building a Yaml pipeline. It really feels a bit Java-like as it’s sensitive for indentation. Truth be told, I hate that. Mostly because I’m often typing fast and missing out on spaces or tabs. But you really have to pay attention here.
name: 'Azure Terraform deployment'

on:
  push:
    branches: [ "main" ]
  pull_request:

permissions:
      id-token: write
      contents: read
This first piece of code gives you the name of the Action, when it should kick into action (whenever I push changes to the main branch) and the permissions it has.
As I wrote about in the beginning of my blog, you need a shared storage for the Terraform state. But, I want to deploy everything with Terraform; a chicken and egg problem because without the storage, you can’t start deploying. So I found some PowerShell code to do this for me.
jobs:
  Windows-latest:
      runs-on: windows-latest
      steps:
        - name: 'Azure Login'
          uses: azure/login@v1
          with:
            client-id: ${{ secrets.AZURE_CLIENT_ID }}
            tenant-id: ${{ secrets.AZURE_TENANT_ID }}
            subscription-id: ${{ secrets.AZURE_SUBSCRIPTION_ID }}
            enable-AzPSSession: true

        - name: 'Create storage RG and Storage Account with PowerShell action'
          uses: azure/powershell@v1
          with:
             inlineScript: |
               az account set -s ${{ secrets.AZURE_SUBSCRIPTION_ID }}
               az group create --location "westeurope" --name rgtfdeployment
               az storage account create --location "westeurope" --resource-group "rgtfdeployment" --name sttfdeployment --https-only --sku Standard_LRS --encryption-services blob --subscription ${{ secrets.AZURE_SUBSCRIPTION_ID }}
               $storageacckey=$(az storage account keys list --resource-group "rgtfdeployment" --account-name "sttfdeployment" --query '[0].value' -o tsv)
               az storage container create --name "tfstate" --account-name "sttfdeployment" --account-key $storageacckey
             azPSVersion: "latest"
This code defines the first job it has to do. It has one single step, namely logging in onto the Azure environment with the Client ID I’ve provided earlier. It has to go to the specific tenant and subscription, again as set into the secrets part earlier. In the next step it uses this login to create a resource group and storage account to store my state-file in.

If this script ran correctly, you’ll see something like this when Terraform has done some work; the state-file. Remember that this is demo code and the container was open for public access. A bad idea but something you can fix yourself ;).
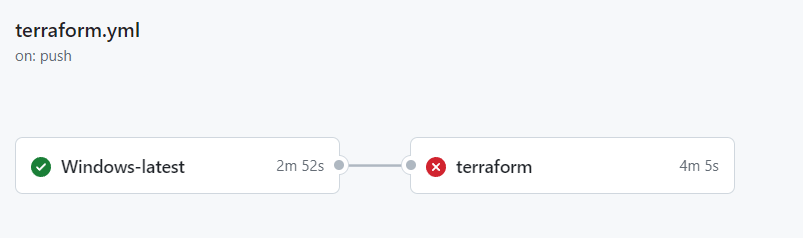
And now for the last part, getting Terraform to run.
 terraform:
    needs: [Windows-latest]
    runs-on: ubuntu-latest

    env:
      ARM_CLIENT_ID: ${{ secrets.AZURE_CLIENT_ID }}
      ARM_CLIENT_SECRET: ${{secrets.AZURE_CLIENT_SECRET}}
      ARM_SUBSCRIPTION_ID: ${{ secrets.AZURE_SUBSCRIPTION_ID }}
      ARM_TENANT_ID: ${{ secrets.AZURE_TENANT_ID }}

    steps:
      - uses: actions/checkout@v2

      - name: Setup Terraform
        uses: hashicorp/setup-terraform@v1

      - name: Terraform Init
        run: terraform init

      - name: Terraform Validate
        run: terraform validate

      - name: Terraform Plan
        run: terraform plan

      - name: Terraform Apply
        run: terraform apply --auto-approve
The code starts with a needs: [Windows-latest]. This ensures that my Terraform deployment only starts after the storage account is created. Else it will start immediately and fail because it hasn’t got a place to store its data. In the env: part, all the login data is provided to create the connection to Azure. The steps are quite straightforward here; checkout the repository, setup terraform (pick up the executable), init terraform, validate the code, plan the output and apply it. The auto-approve again is a bad idea for production, you might want to add a manual approval here to prevent a ‘friday-afternoon issue’.
But, how does Terraform know where to store the data, because there’s no reference to it. Well, in my main.tf file, the one I use for the central configuration, there’s this code:
terraform {
  required_providers {
    azurerm = {
      source  = "hashicorp/azurerm"
      version = "~>3.21.1"
    }
  azuread = {
    source  = "hashicorp/azuread"
    version = "~>2.15.0"
  }
  }

  required_version = ">= 1.5.0"

backend "azurerm" {
  resource_group_name = "rgtfdeployment"
  storage_account_name = "sttfdeployment"
  container_name = "tfstate"
  key = "terraform.tfstate"

}
}
In the backend “azurerm” block are the key-value pairs needed to direct Terraform to the correct storage.
After this, you might see something like this in GitHub:
Yes, I’m still in the ‘red carpet’ phase of my code. But this is the Terraform code itself, not the action. I made some silly mistakes building a demo for Data Saturday Gothenburg. But that’s another story.
Thanks for reading!

Which values are supposed to go in which Github Actions secrets? You say to make several with specific names, but it isn’t clear which of the various things done previously are meant to go in each of them.
LikeLike