The challenge
The challenge i set myself was to build a Windows Server Core Failover Cluster (WSFC) and install SQL Server on top of it to create an Availability Group (AG). The reason behind this was to train myself in creating this kind of environment and to create a testingground for a specific client issue.
The commands i’ve use can be found all over the internets. Where possible i’ve shown you my commands. At some points i’ve had to obscure some parts of commands. You know, passwords and stuff 😉
The basics
I’ve worked on this on two tracks. The first one is a WSFC on VMWare Workstation, the second one on Windows 10 HyperV. This way i could work on this both at work and at home and transfer the lessons learned.
The environment is built on three servers. One domain controller and two cluster servers. All three of them are part of the cluster and just because i could, i added a fileshare witness. But because there’s an uneven number of servers, the quorum is already met.
When you start building your VM, make sure the VM has TWO network adapters. One for the cluster network and a second one for the outside world. This way, you can work on your cluster from machines outside of the cluster, something that proved to be very usefull in the end.
Second, make sure the VM’s are identical in disk sizing and other settings. Otherwise either the cluster won’t create or failing over wil give you really weird results.
Creating the Domain Controller
On the domain controller, a few things need to be done after the installation.
First of all, rename the computer, else you’re stuck with the random names that are generated during the installation.
Rename-Computer -Newname 2016-DC01
That will only take effect after a reboot. But not to worry. By default your server has an IPAddress from the virtualization platform. For a cluster, you want to keep it in a specific range. First of all, check out your current network settings:
Get-NetAdapter
The results you will see depend on your system etc.

I’ve decided to keep Ethernet 2 for my external connections, so the first one will be the cluster connection:
$ipAddress = "10.0.0.2"
$dnsAddress = "127.0.0.1"
New-NetIpAddress -InterfaceAlias Ethernet -IpAddress $ipAddress -AddressFamily IPv4 -PrefixLength 24
Set-DnsClientServerAddress -InterfaceAlias Ethernet -ServerAddresses $dnsAddress
This code will change the IP settings of your server. Because the DNS address moves to localhost you effectively cut off all communication to the outside world. It is a safe way to that, but if you need anything from the internets, you’re stuck.
Before you reboot your computer, check out the timezone. For a cluster, all servers must be in the same timezone. The command is easy:
Get-Timezone
Now, reboot that beast!
Restart-Computer
Because we’re working on the domain controller, we need those features:
Install-WindowsFeature AD-Domain-Services -IncludeManagementTools
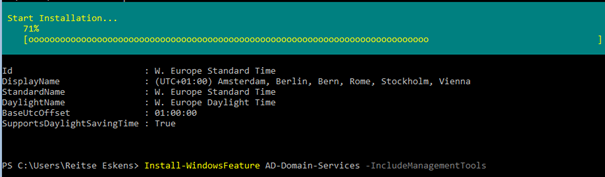
This will take a minute or so to finish.
After that you need to create the Active Directory Domain Service forest:
Install-ADDSForest -DomainName Axians.ReitseEs.Ad
You can copy this off course but you might want to create your own name 🙂

Remember your password! It’s the only key to your Domain Management.
Now, your domain is up and running. Well, almost. What you need are domain users. So let’s create them!
$PWD = Read-Host -AsSecureString
New-AdUser -Name SQLService -AccountPassWord $PWD
New-AdUser -Name SQLAdmin -AccountPassWord $PWD
First time i ran these commands i expected these to be active domain admins and went on. To run into many errors. After some research i found out that these users were very common users with hardly any privileges. To upgrade them to the Admin level i had to alter their membership. This script is the easy way. No granulated rights or whatever.
$SuperUserGroups = (Get-AdUser -Identity Administrator -Properties *).MemberOf
This variable will hold all the properties and memberships of the Domain Administrator. Now we can apply those to the newly created users:
ForEach ($group in $SuperUserGroups){
   Add-ADGroupMember -Identity $group -Members SQLService
}
ForEach ($group in $SuperUserGroups){
   Add-ADGroupMember -Identity $group -Members SQLAdmin
}
Now, we’ve got to nice admins. Let’s use them! And again i got into trouble with users that didn’t exist. It took me some time to figure it out. When i ran the following command on the domain controller i suddenly saw what went wrong:
Get-ADUser -filter *
When you run this command, look for the Enabled option:
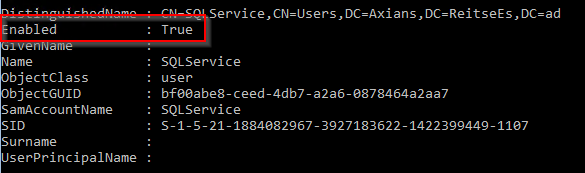
In my case, this said False. And that way, you can’t use the admin. To Enable this, use the following command:
Enable-ADAccount -Identity SQLService
Enable-ADAccount -Identity SQLAdmin
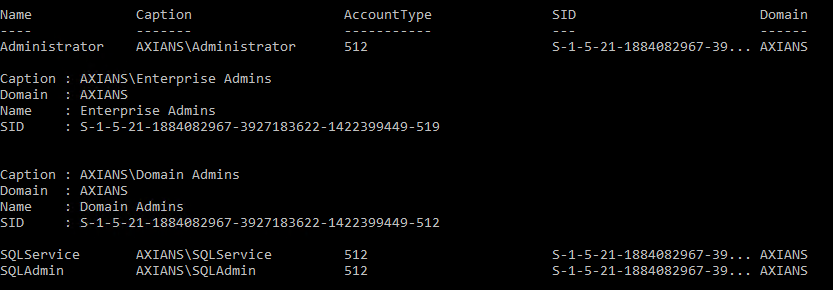
To create an account is one step, but we need to check it.
To show the domain accounts on the domain controller, use this command:
Get-CimInstance -ClassName win32_group -Filter "name = Administrators'" | Get-CimAssociatedInstance -Association win32_groupuser
On my machine, this showed up:
Right. That’s it for the users. Now, to create the file witness share on this machine. I opted for a Samba share. I don’t if this is the best solution, but it works :).
In the following steps, i create the folder and grant samba share acces to a number of accounts.
mkdir SharedVolume
New-SmbShare -name "SharedDisk" -Path "c:\SharedVolume"
grant-SmbShareAccess -Name SharedDisk -AccountName "Administrator" -AccessRight Full
grant-SmbShareAccess -Name SharedDisk -AccountName "SQLService" -AccessRight Full
grant-SmbShareAccess -Name SharedDisk -AccountName "SQLAdmin" -AccessRight Full
This should be all you need to do on the domain controller for now.
The cluster servers
Now, let’s move on to your cluster servers. The steps shown in this part need to be repeated on both servers.
First of all you need to change the names and IP Adresses of the cluster servers to usefull names and addresses in your cluster subnet. Note that de domain server is acting as the dns server for the cluster servers. Change the timezone if necessary to your timezone requirements.
Rename-Computer -NewName WS2016C1
Set-TimeZone -name "W. Europe Standard Time"
$ipAddress = "10.0.0.3"
$dnsAddress = "10.0.0.2"
New-NetIpAddress -InterfaceAlias Ethernet -IpAddress $ipAddress -AddressFamily IPv4 -PrefixLength 24
Set-DnsClientServerAddress -InterfaceAlias Ethernet -ServerAddresses $dnsAddress
Run these commands on both servers and reboot.
After the reboot, you can get the servers to join the domain:
add-computer -DomainName "Axians.ReitseEs.ad" -Server "WS2016DC" -Passthru -Verbose
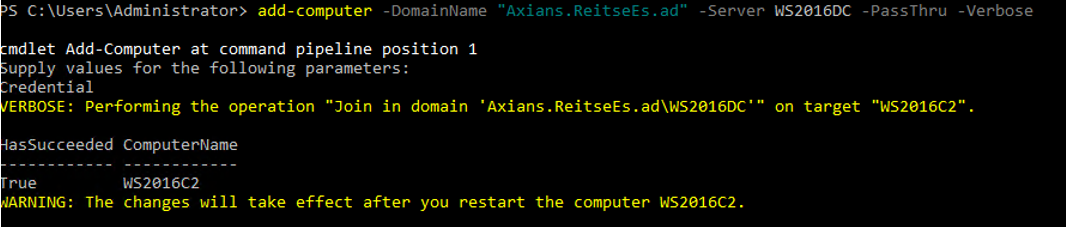
You will get a pop-up to enter your administrator credentials. After that, reboot the beast to finish the domain join.
On each server, enable the powershell remoting option:
Enable-PSRemoting -Force
Set-Item wsman:\localhost\client\trustedhosts *
Restart-Service WinRM
This will enable you to use Powershell on each server, from each server. And you can use powershell on multiple servers at the same time. First we will enable the Failover Clustering option on both servers:
Invoke-Command -ComputerName WS2016C1, WS2016C2 -scriptblock {Install-WindowsFeature -Name Failover-Clustering -IncludeManagementTools} -Credential "Administrator"
This will lead to the installation of the failover clustering option on both servers simultaneously.

Now your cluster contains an even number of servers. This will work but isn’t advised. You’re risking the so-called split-brain syndrome, where both servers think they’re leading when the connection between the servers breaks. Users connected to one of both servers think they are working on the master and this way both servers start to differ. You don’t want to be on call to sort that out…
So we introduce the filesharewitness. This witness makes sure that there’s always a majority of two (in my case).
Set-ClusterQuorum -FileShareWitness "\\10.0.0.2\SharedDisk"

Now, let’s see how the cluster is looking. A few basic commandlets to check if it’s a bit alive.
Get-Cluster
Get-ClusterNode
Get-ClusterNetwork
Get-ClusterQuorum
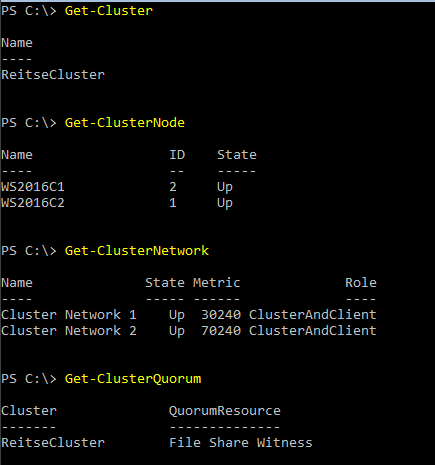
This looks allright to me. But leave a comment if you think otherwise.
Installing SQL Server 2017
Now that we’ve got a failover cluster, it’s time to install SQL Server 2017 on it. I’ve attached the ISO file to a Virtual DVD drive in HyperV / VMWare. Go to the D-drive and start the installation. Because this is a commandline installation, you need to enter a number of settings, because on Server Core, there is no GUI to guide you. So you need to think about the features you want and select them accordingly. A number of flags are required to start the installation.
/Q means quiet installation
/IACCEPTSQLSERVERLICENSETERMS to accept the license
/FEATURES=SQLEngine add features if you need them
/ACTION=Install because we’re installing, right? Right!
/INSTANCENAME=SQLCOREAG choose your own name
/TCPENABLED=1 this does help with connectivity
/SQLSVCACCOUNT=”Axians\SQLService” Hello service account from the domain
/SQLSVCPASSWORD=”<YourStrongPassword>”
/SQLSYSADMINACCOUNTS=”Axians\SQLAdmin” Hello admin account from the domain
/AGTSVCACCOUNT=”NT AUTHORITY\Network Service” Availability Group Terminal Service account
/SECURITYMODE=SQL So you can connect from different domains as well
/SAPWD=”<YourNextStrongPassword>”
.\Setup.exe /Q /IACCEPTSQLSERVERLICENSETERMS /FEATURES=SQLEngine /ACTION=Install /INSTANCENAME=SQLCOREAG /TCPENABLED=1 /SQLSVCACCOUNT="Axians\SQLService" /SQLSVCPASSWORD=”Axians123” /SQLSYSADMINACCOUNTS="Axians\SQLAdmin" /AGTSVCACCOUNT="NT AUTHORITY\Network Service" /SECURITYMODE=SQL /SAPWD=”Axians123”
Fire it off and time for a coffee. Or tea. Or whisky if it’s late and screens turn red at times and you want a different profession.
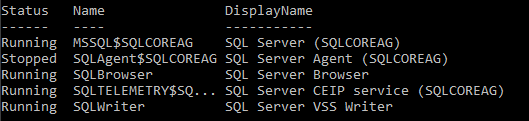
If the installation has finished succesfully, you can check if the services are alive:
Get-Service -Name *SQL*
Now, login to your SQL Server on the one you intend to use as your primary replica and restore the databases you want.
Creating the AlwaysOn Availability Group
This is the last part. First of all we enable the feature:
Enable-SqlAlwaysOn -ServerInstance WS2016C2\SQLCOREAG -Force
Enable this on both servers. Now, there are a number of commandlets to let you enable the rest, but those kept failing at some point in my environment. Mainly because of some weird ‘missing file’ error. In the end i stopped the fight and resigned to using the SQL Server Management Studio wizard.

You enter the name of your AG and databases that should be in the group.

Select the databases you want to include in your AG:

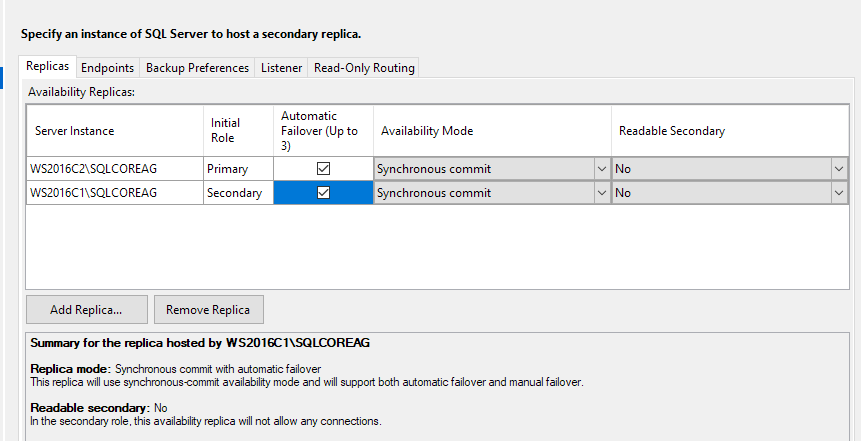
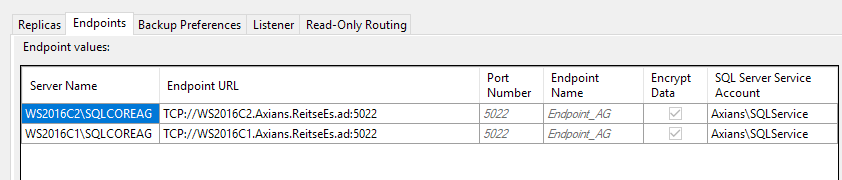
Select the replica’s, enpoints, backups and listener:

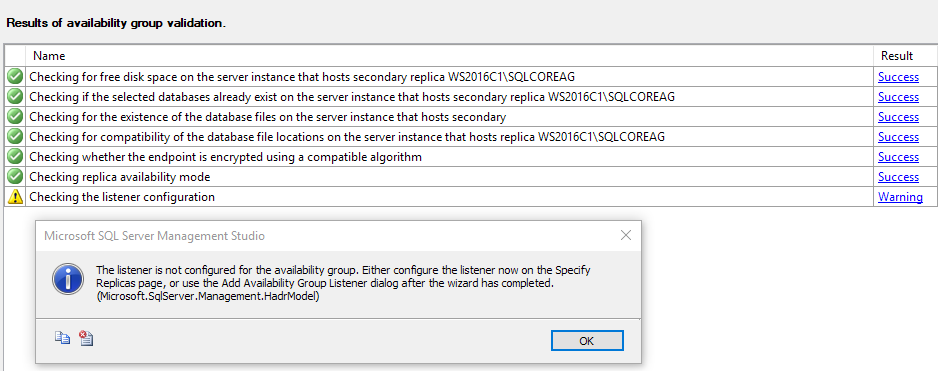
This warning looks like a bug in SSMS 17.9. Because when i try and create a listener, i can’t continue with the wizard.
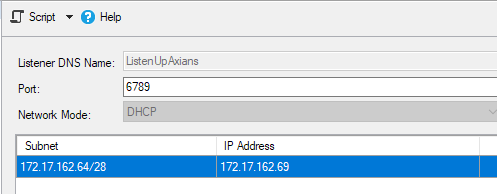
But i can add a listener through another wizard, in the end it looked like this:
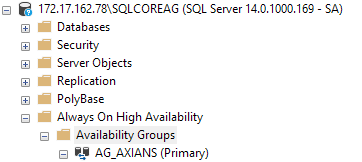
You can see the status of your AG in SSMS:

And now we can connect to the listener so we don’t have to choose which server to connect to 🙂
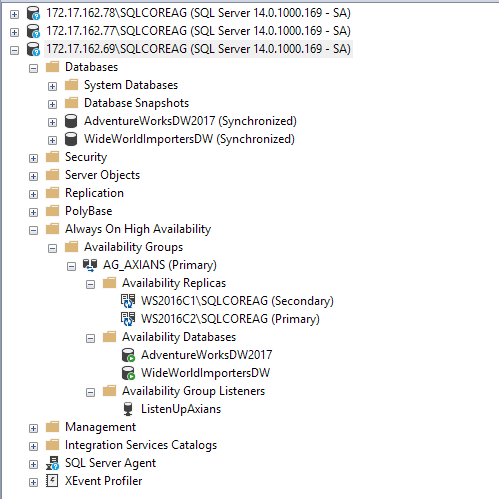
Both databases are synchronized, you can see the primary and secondary servers and now you get a nice dashboard too!

The next part, for another time, will be how to monitor stuff like this through powershell. And how to use the psdbatools to accomplish this setup. Because this was some manual labour that could have been automated through that magnificent set of tools. But as mentioned, that’s for another blog.
Thanks for reading!
