In my previous blogs on learning ADF, I loaded data from on-premises to an Azure DB and in the next step I loaded data from the database to parquet files. But loading the file was hard-coded. Both source and target were typed in and had their own dataset. If your source-system contains very few tables, this might work, though you’d get bored out of your mind if you had to repeat the steps. You can export the json that defines your pipeline, edit the parts that need editing and reload them in ADF to save you some work. But in the end, you’re still doing repetitive work. And you don’t have to!
Updates while you work
As I was writing this blog, Microsoft released an update on ADF. You can read the official documentation here. ADF can do the heavy lifting for you when it comes to creating a parametrized pipeline to load data from your source to any sink.
This is really cool but in a way it feels a bit like a maintenance plan. It gets the work done without much work from your side. But you lose some control over the process. And I think you’ll benefit from the knowledge how to create a copy-flow with parameters, because the concept still stands and can be reused in other objects. If you prefer a video on how to create a lookup-foreach pipeline, you can find a good one here.
Prerequisites
In my previous blog I created the integration runtimes, and the linked services. However, we need to create new datasets. If you remember, and I don’t blame you if you don’t, the dataset I created contained a reference to a table. That’s nice, but this time we don’t want just one table, we want a number of tables.
Dataset for the lookup
First up, a new dataset. This time I’m going to leave some options empty. But, we need to prepare for what data we want. In my case, I want a specific subset of tables from my database. This query is returning the tables I want to get from my source to the datalake.
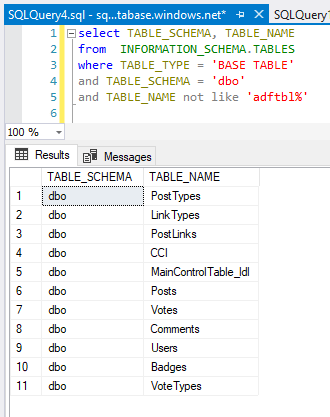
After some validation and checks, the result is good and I can proceed to the next step, creating a dataset for my source data. In my previous loading demo, I created a dataset connected to a specific table. This time, my dataset has no table name defined. It’s just the connection to the linked service.
Lookup
After creating the dataset that’s linked to the source, I can immediately put it to good use. On the pipeline, add the Lookup from the general section. This Lookup will, well, lookup data for you.

The lookup has to have a good name and description. Seriously, when it’s 4 am and you’re fixing bugs, you’ll thank me. Or probably not. But still, these descriptions will save your bacon at some time.

In the settings section, instead of linking a table (a table you’ve defined in your dataset) you can use a query to get the data you need. The query you’ve created is the one you’ll paste here. The hawk eyed ones reading this blog might notice the dynamic content option available for the query window. That’s something for a later blog, but remember you can use parametrization here as well. Though you can debate if it’s a good idea or not.

When you’re using a query, you can use the option to get the first row only, or not. In the first case, you’ll get only one row. As our query is returning multiple rows, and should do that, we’re going to uncheck that option.


At the time of writing, the official documentation shows the following limitations:
- The Lookup activity can return up to 5000 rows; if the result set contains more records, the first 5000 rows will be returned.
- The Lookup activity output supports up to 4 MB in size, activity will fail if the size exceeds the limit.
- The longest duration for Lookup activity before timeout is 24 hours.
- When you use query or stored procedure to lookup data, make sure to return one and exact one result set. Otherwise, Lookup activity fails
You can read the most recent limitations here.
ForEach loop
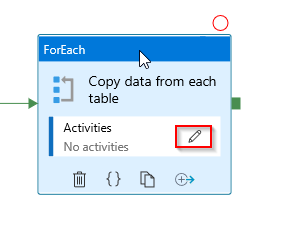
This is all we have to do to get the lookup working. That wasn’t all that hard. But, we have to do something with the results, we have to loop through all the results and do what we have to do. To be able to do that, we have to add a ForEach object. This you can find under the Iteration and conditionals section. The ForEach will do as it’s name suggests, for each object that it gets, it will do some work. So for each object it gets from my lookup object, it’s going to copy data (in the end).


When you click on the ForEach object, you’ll see the general options (give it a sensible name and description) but we need to go to the settings. This is because we have to help out with the items.

If you look closely, you’ll see that the ForEach already ‘knows’ it’s in a parametrized pipeline (or it’s just the default behaviour, not sure yet). So, you’re going to need to add dynamic content.

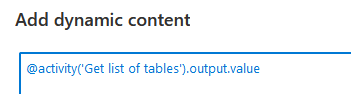
If you click on the blue link, you’ll get a suggestion from the activity outputs.

Click on the link and your field will get filled. Now, there are two options you’ll have to decide on yourself. The first option is output.value. This contains the array with, in our case, the schema-name and table-name. The alternative is output.count. This will provide you with the number of items in the array. If you want, you can use that number for your own logic, though the for-each might not be the best place to do that.
As I want to use schema- and table-names, I’m going with the output.value.
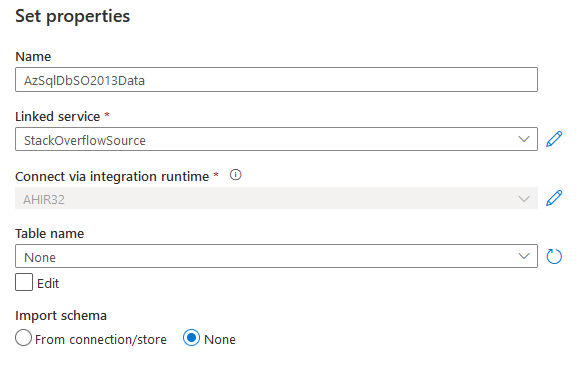
Source dataset
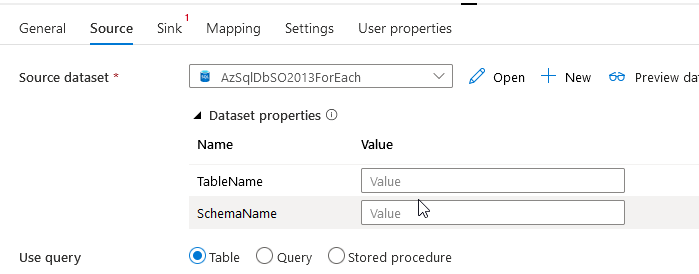
Now that I’ve configured the lookup and the for-each, it’s time to configure the source and sink datasets. First up the source. I’m reusing the linked service but creating a new dataset. This because using one dataset to rule them all will somewhere result in a disaster.

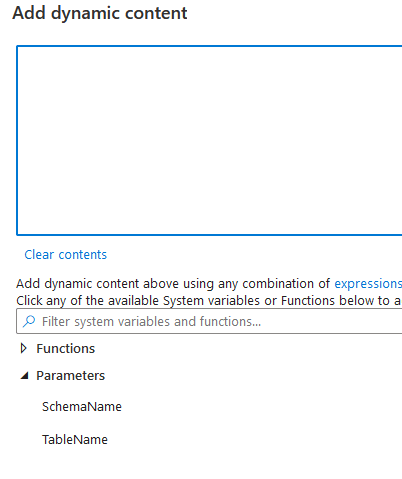
Again, there’s no table definition because the table- and schema-name are coming from the lookup. But, I need to ‘store’ the values somewhere. This is where the parameters of the object come into play. In this case, I’m adding two parameters. One for the table-name and one for the schema-name.

Switch back to the connection tab and now we can add dynamic content to the table. This is where I can define the schema and table names dynamically. Because we’re looping through the tables, every loop has different values. So by using the dynamic content we can fill the values for the table (schema.table) with the correct data. You might find that your database just uses the dbo schema, but a lot of databases have multiple schemas with identical table names. And you want to make sure you get the right table.


Sink dataset
The steps I had to take for our source dataset have to be repeated for the sink. This time I’m using a datalake gen2 object (same as in the previous blog) but again, I’m leaving a number of fields empty.

And again, I’ve got to add a parameter, but this time just one. Because I can compose my filename from one parameter. You can decide if it’s a simple one or a hard one.
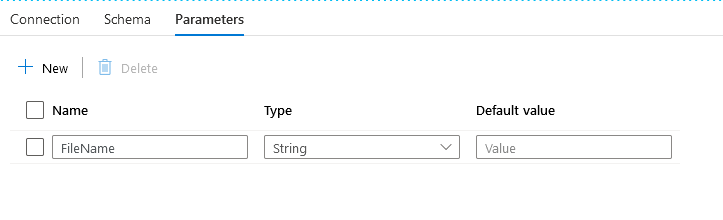
After creating the parameter, I’m adding this one with the dynamic content editor. On a side-note, if you just type the code, it won’t be recognized as dynamic content and the filenames just get this weird mark-up.


Copy data inside ForEach
After all these parts, time to connect the last parts together. The ForEach in itself can’t do anything. You have to add activities. In a way, you can compare it a pipeline, though it isn’t. You can’t nest a ForEach inside a ForEach for example.
This time, I’m using a copy data object, because all I need to do is copy data from the database to the datalake.

In the sink settings, the dataset parameters immediately show up. Now I’ve got to make sure they get the correct values on runtime.
Again, I have to use the dynamic content.

If you click on the link, the familiar interface for the dynamic content shows up. But now there are two options folded out, the activity outputs and the ForEach iterator. Because this copy activity resides inside the ForEach iterator, that’s the output I want to use. Click on the item below the ForEach iterator.

When you click there, you’ll only get @item(). But you need to add what you need from the iterator. That’s when your query comes back. Remember the output from your query?
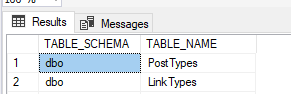
The column headers are the values you’re going to need. In my case, in the TableName parameter I have to add the header from the query result. In this case table_name. Yes, the query is using capitals but my database is case insensitive.

Same goes for the SchemaName.

This is all I’ve got to do to make the source dynamic. Now onto the sink part. Because I have tell ADF how I want to name the files that are created. In the sink settings, all I did was point to the main container. No folder or filenames have been defined.


Yes, it’s getting tedious and the default part to click, but again click on the blue link for the dynamic content.

Now this one is a bit more complex. Because I want to have the full table qualifier (schema and table), I have to stitch those two parameters together. ADF offers the @concat() function to do this. Inside the concat function I’m beginning with the table_schema. To get the concat to work, I have to separate the different parts with a comma. Next I’m splitting the schema and table names with an underscore.
Finally, I like to see when my file was created. This way I can be sure that a second run of the pipeline won’t overwrite my file but place it beside the original one. There are a number of functions available to do that, I’ve chosen the utcnow() function. This adds the UTC time of running the pipeline to my filename.
Finally I’m adding the .parquet file extension to make sure the extension meets the type of file and subsequent procedures can make use of the files as intended.
@concat(item().table_schema,'_',item().table_name,utcnow(),'.parquet')
After saving the dynamic content, it looks like this.

Run the pipeline
After all this work, time to run the pipeline and see what happens. I’m getting all the tables as expected and the filenames look the way I’d expect them to. I need to work on the formatting because I clearly forgot to add an extra separator between the tablename and the timestamp. And maybe I can do with less precision with the time. But hey, it’s a learning curve remember?
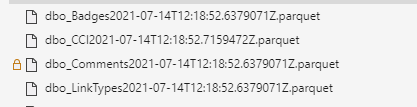
Right, we made it. Without explicitly qualifying the tables I want to copy from the database to my data lake, I got the data across.
Finally
You can save the pipeline as is, but you can save it as a template for reuse later on.
What I found out during the creation of this pipeline is that you need to know what you want to do before you start. You have to have a plan what data you want to copy, where to put it etc. In other words, plan before you start off clicking stuff together.
Now that I’ve got my data in my data lake, next up is to get from the data lake to my datawarehouse database.
Thanks for reading!
